How Does Vapor Degreasing Work?
Vapor degreasers actually are pretty simple machines. They use a straightforward thermo-mechanical process — boiling and condensing a low-boiling cleaning fluid — in conjunction with some clever hardware design to deliver high quality cleaning quickly, consistently, easily and inexpensively.
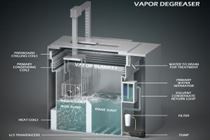
The Vapor Degreaser Design
A vapor degreaser is a special type of still. In the simplest form, the degreaser boils a cleaning fluid into vapors and fumes. Because warm vapors are lighter (less dense) they rise upwards in the machine but are trapped by a layer of refrigeration which creates a temperature inversion. The vapors then condense back into liquid form and returned in to the cleaning machine to be re-used. The schematic below illustrates the basic flow of the system.
As the schematic shows, there always is fresh cleaning fluid in the rinse sump. As additional freshly-distilled cleaning fluid is returned from the cooling coils back into the system, it always is returned to the rinse sump. The rinse sump gradually overflows into the boil sump, which is where the heaviest cleaning is performed and where the contamination becomes concentrated.
Important point to understand, and unlike aqueous cleaning: the cleaning fluid never wears out. Because the cleaning fluid is constantly being repurified and recycled, it is used hundreds or even thousands of times. This makes vapor degreasing very, very affordable.
It’s important to note that “boiling” does not imply a lot of heat. Most MicroCare, Opteon, Vertrel and Tergo cleaning fluids boil at very mild temperatures, usually between 40˚C/105˚F and 65°C/165°F, depending upon the exact formulation. Low temperatures enhance worker safety and also keep energy costs down. In fact, many modern vapor degreasers operate on 25 amps or less.
As you might expect, there are dozens of variations and improvements on this very simple process, such as adding ultrasonics, but all of those enhancements are merely upgrades to these basic three steps. It’s fast, simple, fool-proof, and safe cleaning design.
Details of Vapor Degreaser Design
Most degreasers have two tanks or sumps: a boil sump and a rinse sump. The schematic below explains the design in more detail.
Everything starts in the boil sump. That’s where most of the heavy-duty cleaning occurs. The heating coils tucked underneath the sump warm the cleaning fluid to it’s boiling point; the tumbling action of the boiling fluid enhances cleaning. Also, as the cleaning fluid boils it creates vapors (think, steam, but steam made from cleaning fluid not water). The saturated fluid vapors sit above and across the two solvent sumps. Because they’re warm, they tend to rise upward within the machine.

Above the sumps and the fluid vapors there should be two layers of cooling coils. These coils create a zone of cold, dry air over the machine; a temperature inversion. The warm vapors cannot punch through this barrier; this “cold trap” prevents the vapors from simply rising out of the machine unhindered. Stuck in the machine, these vapors quickly come into contact with the cooling coils. The vapors condense back into liquid and flow into the water separator (“distillate”) and then back into the rinse sump.
The rinse sump contains only pure, freshly distilled cleaning fluid. This is used to rinse the parts of any last vestige of contamination. Since the rinse sump constantly is having cleaning fluid added to it, from the water separator, it quickly overflows. The excess cleaning fluid flows into the boil sump, completing the recycling loop.
(Special note: The water separator sits along side the machine. Since the degreaser is constantly chilling vapors, it collects water out of the air. This water needs to be removed for fast, spot-free cleaning.)
Using a Vapor Degreaser
There are only a few steps to using a vapor degreaser:
- Place the products to be cleaned in a basket.
- Slowly lower the parts into cleaning fluid vapors above the boil sump for the first few moments of cleaning. The vapors condense on the (relatively) cool parts and cleaning starts. Any liquid cleaning fluid drips off of the parts and falls back into the boil sump.
- Continue lowering the parts into the boil sump. The cleaning fluid wraps around the parts, goes into and out of the tightest spaces, and dissolves oils, greases and fluxes. This is where the heavy cleaning occurs. Notice the gentle nature of vapor cleaning: there are no high-pressure sprays, no air knives, no high temperatures stressing the components. It’s simple, fast and easy.
- Remove the parts from the boil sump and move them into the rinse sump. Here, fresh, pure distilled cleaning fluid removes any final vestige of the contamination.
- Once rinsing is complete, slowly remove the parts from the rinse sump, up through vapors, and remove them from the machine. The parts come out clean, dry and relatively cool, ready for the next manufacturing process.
There are many additional features and accessories which are available from the various equipment manufacturers. Savvy engineers will review their options to insure they get the machine which will provide optimal performance at the lowest total cost per part cleaned.
Summary
Vapor degreasing with modern, planet-friendly MicroCare cleaning fluids delivers the highest quality of cleaning in the shortest possible time, with the least risk of damage to the components. Wherever there are demanding specifications or challenging environmental issues, the MicroCare answers and a vapor degreaser are the ideal combination. These are great replacements for old-style aqueous cleaners as well as old-style hazardous solvents like TCE, nPB and Perc.