The Importance of Drying in PCB Cleaning
There are four steps to successfully cleaning PCBs (printed circuit boards). Wet, scrub, rinse and dry. The wet, scrub and rinse operations are obvious. Wet the board with a pure cleaning fluid. Scrub it using a good quality scrubbing brush. Then rinse it off with more clean fluid. However, the dry step is often overlooked or in some instances, completely left out of the PCB cleaning plan. For reliable performance, circuit boards must not only be clean, they must be dry in order to function properly. Leftover moisture on a PCB surface can lead to a host of problems including corrosion, electrochemical migration, delamination, dendrite growth, pin holes and blow holes and adhesion problems with conformal coatings later in production.
Modern PCBS often have bottom termination components like land grid arrays and QFN (quad-flat no-leads) with very tight standoff heights. Moisture can get trapped under these components, making drying even more complicated. There are different ways to dry PCBs depending on the cleaning process used including in-line aqueous cleaning, benchtop scrubbing or vapor degreasing.
This article outlines the various techniques and tools used when drying PCBs either in a vapor degreaser or at the benchtop. Whether using heat, vapor, wipes or compressed gas, there is a drying method available to ensure printed circuit boards are not only clean, but also dry for optimum reliability and performance.
Batch Cleaning & Drying with Vapor Degreasing
For bulk or batch drying PCBs, convection ovens with air knives might be used. However, when using drying ovens, temperature and air flow are major concerns and care should be taken. For example, if the circulating air flow isn’t strong enough or if the temperature isn’t high enough, it might not reach the moisture under low-mounted components. Or if the temperature is too high, it may cause surface damage to the board itself or the components by baking on any residual contaminants left behind.
Vapor degreasing is an affordable and convenient alternative to using drying ovens. Vapor degreasing is an industrial cleaning process for PCBs that is quick, consistent and affordable. The process uses cleaning fluid immersion, combined with vapor rinsing and vapor drying, to remove all types of contaminates including fluxes, pastes, particulates and residue. Cleaning and drying PCBs using the vapor degreasing method uses nonflammable cleaning fluids in special, engineered cleaning machines called vapor degreasers.
Vapor degreasers range in size from small benchtop models to huge floor systems. No matter what the size vapor degreaser being used, the cleaning and drying processes are the same. The vapor degreaser boils a cleaning fluid at a low temperature, usually between 40˚C/105˚F and 65°C/165°F, to produce a pure, clear and dense vapor blanket. PCBs are lowered into the boiling cleaning fluid in the boil sump to heat, loosen and remove the majority of the contamination. They then move to the rinse sump where any final vestige of contamination is rinsed away. Finally, the PCBs are raised up and held inside the vapor blanket, allowing the parts to dry and cool. The entire process takes approximately 8-15 minutes per batch.
The cleaning fluid has a low surface tension allowing it to permeate the entire board, including under and in-between tightly-spaced components to wash away oils, fluxes and residue. Using a low temperature fluid minimizes the risk of damage to the PCBs and since the cleaning fluid is ultra-pure, it leaves no residue behind. The vapor blanket dries the PCBs extremely quickly. The vapor passes under the low-mounted components, so that the PCBs come out of the vapor degreaser completely dry, cool enough to handle and immediately ready for packaging or the next phase of manufacturing.
Manual Cleaning & Drying with Wipes and Dusters
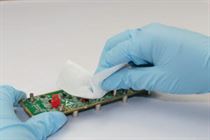
One of the most commonly used methods technicians use to dry PCBs during benchtop cleaning is a simple lint-free wipe. Whether using it to capture the excess spray of cleaning fluid on a circuit board or gently pushing the wipe under low-surface mounted components, wipes are a quick and effect ive way to dry the PCB without leaving lint or fuzz behind.
There are many factors to consider when selecting a lint-free drying wipe including absorbency, material and packaging. The most important factor when choosing a drying wipe is the ability of the wipe to absorb the type of moisture encountered. For example, some wipes will absorb cleaning fluids, but they will not absorb water. The key is to match the type of wipe absorbency to the contamination to be removed.
The material makeup or the type of fiber used to make the wipe is also important. Nonwoven wipes, since they are made without glues or binders, don’t leave residue on the surface being cleaned, resulting in a cleaner PCB. Another way to limit re-contamination to the PCB is to choose pre-washed wipes or wipes with finished or heat-sealed edges. This eliminates loose fibers and dust, ultimately leaving the printed circuit board cleaner.
Packaging is also an important consideration when choosing a drying wipe. Some manufacturers require wipes to have static-dissipative properties and to be packaged in ESD-safe wrappers. These specialty ESD wipes not only limit dust attraction, but also limit the threat of static damage to the electronic components. Other manufacturers may require clean room type wipes for maximum cleanliness. Clean room wipes are typically cut and packaged in a clean room environment to ensure their purity.
For some benchtop post reflow (rework) assembly a good drying method is to use a dust remover. A quick blast of from a duster can be effective at blowing trapped moisture from underneath larger components that a wipe alone might not reach. The dust remover can be targeted to a very small area on the PCB and works extremely well in getting into and under intricate and hard-to-reach nooks and crannies on the circuit board.
Using a duster in combination with a wipe doubles the drying power and prevents the fluid from being pushed back onto on the board and spreading contaminant around. When selecting a duster to use for a drying application, safety is key. Inexpensive canned air is readily available from a number of retail outlets. However, many of these formulations may pose a hazard due to their high flammability ratings. A safer alternative is to select a dust remover that is made with nonflammable gas. A 360° type of dust remover also adds drying convenience since the can operates at any angle, even upside down, allowing operators the flexibility to quickly dry very complex or intricate PCBs. Using the duster may take a little bit of practice, but once the operator understands the velocity of the high-purity gas, the moisture can be blown away quickly and efficiently with no residue left behind.
Stay Dry Before and After Cleaning
Moisture is a potential threat to PCBs throughout the entire manufacturing process, not just during the cleaning phase. PCBs can pull moisture out of the air at any stage, so it important to keep PCBs dry. Using climate control in your facility or designating an area for “dry” PCB storage away from other manufacturing operations may help prevent this issue. Properly handling PCBs during pre-and-post cleaning storage and shipping helps protect moisture-sensitive components on the board. Finally, after the PCBs are cleaned and dried, be sure to package and store the cleaned PCBs with care to prevent any subsequent moisture infiltration before shipping to end users.
Conclusion
Moisture left on the today’s modern PCBs may impact the function and the reliability of the printed circuit boards. Water or cleaning fluid left behind after rinsing may cause a number of problems including corrosion, delamination, electrochemical migration and dendrite growth. To prevent these problems from occurring it is imperative that PCBs are completely dry. No matter what drying method used, the goal is to ensure that PCBs are not only clean, but also dry for optimum dependability and performance. It is recommended to work with a partner with specialized experience and expertise in PCB cleaning and drying to choose the best methods to use.